Make documentation great again (2/2)
This article is part of a series called "Make documentation great again"
We have previously seen a presentation of the AsciiDoc language and the benefits of "Documentation as Code".
However, it is possible to make the documentation writing process even easier! It is customary to document the API that we develop to facilitate its maintenance and interactions with its consumers.
Even though one of the 4 values of agility promotes "working software over comprehensive documentation," we will see that we can provide both at the same time with a particularly useful tool.
Spring REST Docs
Spring REST Docs greatly simplifies the process of writing API documentation by combining manual writing with the injection of auto-generated sections.
It relies on Spring MVC Test, widely used for testing the "web" layer of a Spring application. In other words, adding it to an already ongoing project does not require a complete overhaul of its tests… and that is obviously a good thing!
A demonstration project
In order to base our discussion on a concrete example, I propose a small demonstration project available on GitHub.
In such cases, there is no need to imagine a very complicated use case, so I have implemented a simple CRUD that manipulates a Company object.
A Company is defined by an ID, a name, a location, and a creation date.
To resemble a real project, I have also added an interaction with a MongoDB database that needs to be started before launching the application.
To add a Company, you can make a POST request with the following body:
{
    "name": "CoolCorp",
    "location": "Paris",
    "creationDate": "2021-10-29"
}
Add the necessary dependency
First and foremost, you need to add the "Spring REST Docs" dependency to the project:
pom.xml file: <dependency>
<groupId>org.springframework.restdocs</groupId>
<artifactId>spring-restdocs-mockmvc</artifactId>
<scope>test</scope>
</dependency>As for the other dependencies that make up this application, there is no need to list them here as they are very common and independent of the documentation generation tool.
Modify Controller tests to generate documentation
Now we can look at the tests and add specific instructions to generate the elements we are interested in.
Let’s focus on the test for the request to retrieve a Company based on its ID.
Note that I have simply mocked the service layer for these controller tests, so they are clearly not end-to-end tests.
CompanyControllerTest: @Test
void getCompany() throws Exception {
final String ID = "ID_1";
when(companyService.getCompany(ID)).thenReturn(company1);
this.mockMvc.perform(RestDocumentationRequestBuilders.get("/companies/{id}", ID)) // (1)
.andExpect(handler().handlerType(CompanyController.class)) // (2)
.andExpect(handler().methodName("getCompany"))
.andDo(print())
.andExpect(status().isOk())
.andExpect(content().json(objectMapper.writeValueAsString(company1)))
.andDo(document( // (3)
"getCompany",
ControllerTestUtils.preprocessRequest(),
ControllerTestUtils.preprocessResponse(),
pathParameters(parameterWithName("id").description("The requested company id")), // (4)
responseFields( // (5)
fieldWithPath("id").description("The company unique ID"),
fieldWithPath("name").description("The company name"),
fieldWithPath("location").description("The company location"),
fieldWithPath("creationDate").description("The company creation date"))));
}-
First, we use
RestDocumentationRequestBuildersto make the request instead of the traditionalMockMvcRequestBuilders. The difference? It captures request information for documentation purposes. -
We perform the usual tests: check that the request is handled by the
getCompany()method of theCompanyController, that the response has HTTP status code200, and that it contains the expected object. -
New instruction! Here we trigger the generation of documentation, named "getCompany" for this request. Let’s forget about the next two lines for now.
-
Document the variable part of the URL: the
CompanyID is passed as a "path parameter", and we can describe it (even though in our case this parameter is quite self-explanatory). -
Document the response of the request: we can describe each field of the
Company.
From now on, if you add a field to the Company object without documenting it in this test, it will fail.
The same goes if you remove a field, as the test will try to document a non-existing element.
This provides a new level of safety: your API cannot evolve without you being fully aware of it!
So, we have a test that documents the most obvious passing case: when a Company corresponding to the requested ID is found.
Let’s move on to a new test for the opposite case.
CompanyControllerTest with an error test @Test
void getCompanyNotFound() throws Exception {
final String ID = "ID_3";
when(companyService.getCompany(ID)).thenThrow(new CompanyNotFoundException());
this.mockMvc.perform(RestDocumentationRequestBuilders.get("/companies/{id}", ID))
.andExpect(handler().handlerType(CompanyController.class))
.andExpect(handler().methodName("getCompany"))
.andDo(print())
.andExpect(status().isNotFound())
.andDo(document(
"getCompanyNotFound", // (1)
ControllerTestUtils.preprocessRequest(),
ControllerTestUtils.preprocessResponse()));
}-
Just like in the previous test, we add the
document(…)instruction, but this time with a new identifier ("getCompanyNotFound") to differentiate the generated documentation in this new case.
However, it is not necessary to generate additional documentation here, as the description of the "path parameter" has already been done in the previous test, and the request returns nothing but an HTTP 404 error.
When running the two tests we just saw, files (referred to as "snippets") will be generated under target/generated-snippets.
And unsurprisingly, they are .adoc files!
If we open, for example, getCompany/response-fields.adoc, we can find:
|===
|Path|Type|Description

|`+id+`
|`+String+`
|The company unique ID

|`+name+`
|`+String+`
|The company name

|`+location+`
|`+String+`
|The company location

|`+creationDate+`
|`+String+`
|The company creation date

|===
Let’s be honest: even though we can see that the entered elements are present in the test, it is not very readable… And there are no less than 14 files generated for two small tests, who would read that?!
It is time to generate more readable documentation!
The documentation source file
One file to rule them all. That’s the goal we should set ourselves to make our documentation viable.
So, we will add a file under source/asciidoctor: index.adoc.
This is where we will inject our snippets (and only the ones we are interested in), with some manually added text to make the whole thing more digestible.
index.adoc that will become the documentation=== Get one company // (1)
.Request
\include::{snippets}/getCompany/http-request.adoc[] // (2)
.Path parameters
\include::{snippets}/getCompany/path-parameters.adoc[] // (3)
.Response
\include::{snippets}/getCompany/http-response.adoc[] // (4)
.Response fields
\include::{snippets}/getCompany/response-fields.adoc[] // (5)
.Response if the company was not found
\include::{snippets}/getCompanyNotFound/http-response.adoc[] // (6)-
Let’s give a small title to this part of the documentation to describe the endpoint being documented below.
-
We inject a snippet containing the request, which is probably the best representation of it.
-
We inject a snippet containing the description of the "path parameter".
-
And the snippet illustrating the received response.
-
Don’t forget the snippet describing the response fields.
-
We had two tests on this endpoint, so let’s show what the response looks like when the
Companyis not found.
For now, we have just created a documentation skeleton. Depending on your IDE, you may already see a rendering!
To improve the documentation, you can add a table of contents, a main title, etc.
These are basic AsciiDoc features and annotations, and I suggest we don’t dwell on them.
You can get an idea of what can be done by looking at the file index.adoc of the demonstration project.
Generating the documentation
Now that we know how to generate snippets and how to combine them into a single file, it’s time to automate the generation of the HTML page that will contain all the documentation.
For that, we will rely on a Maven plugin: asciidoctor-maven-plugin.
pom.xml <build>
<plugins>
<plugin>
<groupId>org.asciidoctor</groupId>
<artifactId>asciidoctor-maven-plugin</artifactId>
<version>2.2.1</version>
<executions>
<execution>
<id>generate-docs</id>
<phase>prepare-package</phase>
<goals>
<goal>process-asciidoc</goal>
</goals>
<configuration>
<backend>html</backend>
<doctype>book</doctype>
<attributes>
<snippets>${project.build.directory}/generated-snippets</snippets>
</attributes>
<logHandler>
<outputToConsole>true</outputToConsole>
<failIf>
<severity>DEBUG</severity>
</failIf>
</logHandler>
</configuration>
</execution>
</executions>
<dependencies>
<dependency>
<groupId>org.springframework.restdocs</groupId>
<artifactId>spring-restdocs-asciidoctor</artifactId>
<version>${spring-restdocs.version}</version>
</dependency>
</dependencies>
</plugin>
<plugin>
<groupId>org.jacoco</groupId>
<artifactId>jacoco-maven-plugin</artifactId>
<version>${jacoco-maven-plugin.version}</version>
<executions>
<execution>
<id>prepare-agent</id>
<goals>
<goal>prepare-agent</goal>
</goals>
</execution>
<execution>
<id>generate-report</id>
<phase>verify</phase>
<goals>
<goal>report</goal>
</goals>
</execution>
</executions>
</plugin>
</plugins>
</build>This code generates an HTML page from the target/generated-snippets directory while blocking the build in case of errors (missing snippet, etc.).
By executing a command like mvn package, the tests will be run, the snippets will be generated, and finally the index.html page will be created from the index.adoc file.
It can be found in target/generated-docs.
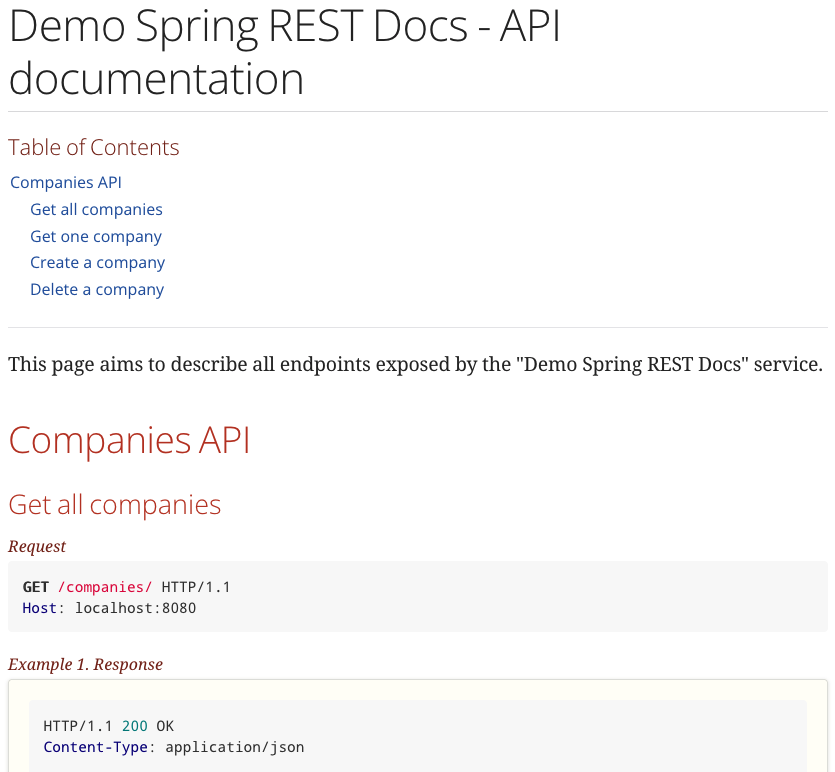
So, we have seen how to generate an HTML page describing the endpoints of a Spring Boot application using Spring REST Docs, without refactoring all controller tests.
The tool is quite comprehensive, and there are still many small details to cover to be more exhaustive. But I suggest we wait for an article presenting some bonus features!
Useful links: